How to Build a Shed

So you’ve found the perfect garden shed, but you’re not sure if you have the DIY skills to erect it yourself. All of our sheds come with a cost-effective installation option, however for some, building a garden shed can be a fun DIY challenge - but due to the size and weight of the panels it's definitely a two person job.
Your shed will arrive with a comprehensive assembly guide, and for this article we’re using the Albany Norfolk Apex Shed as an example for our step-by-step guide, however the basic principles are the same for all wooden sheds.
What tools will I need to build a shed?
- Hammer
- Cross head screwdriver (preferably battery operated)
- Spirit level
- Stanley Knife
- Saw
- Stepladders
- 10mm spanner or socket
Does my shed need a base?
Your shed comes complete with a solid, battened wood floor, however we always recommend that a shed or larger building is installed onto a flat, concrete base to ensure a solid footing - a laid concrete slab base is ideal. Plastic shed bases are available to place a shed onto a soft surface such as grass, however this doesn't guarantee that your shed will stay even, eventually resulting in damage to the structure and drainage problems.
For a surface such as gravel, a shed can be laid on a solid foundation such as railway sleepers, however ensure that the whole of the floor is fully supported.
Lay out the shed components
Start by unpacking all of the shed components, then lay the floor panel in its location. Ensure that you leave enough room around the base for any roof overhang, and to allow for maintenance of the shed. Use a spirit level to check that the floor is sitting level on your base, you may need to add packing to one corner if not.
Then place the side and gable end panels around the floor to get an idea of how they fit together.
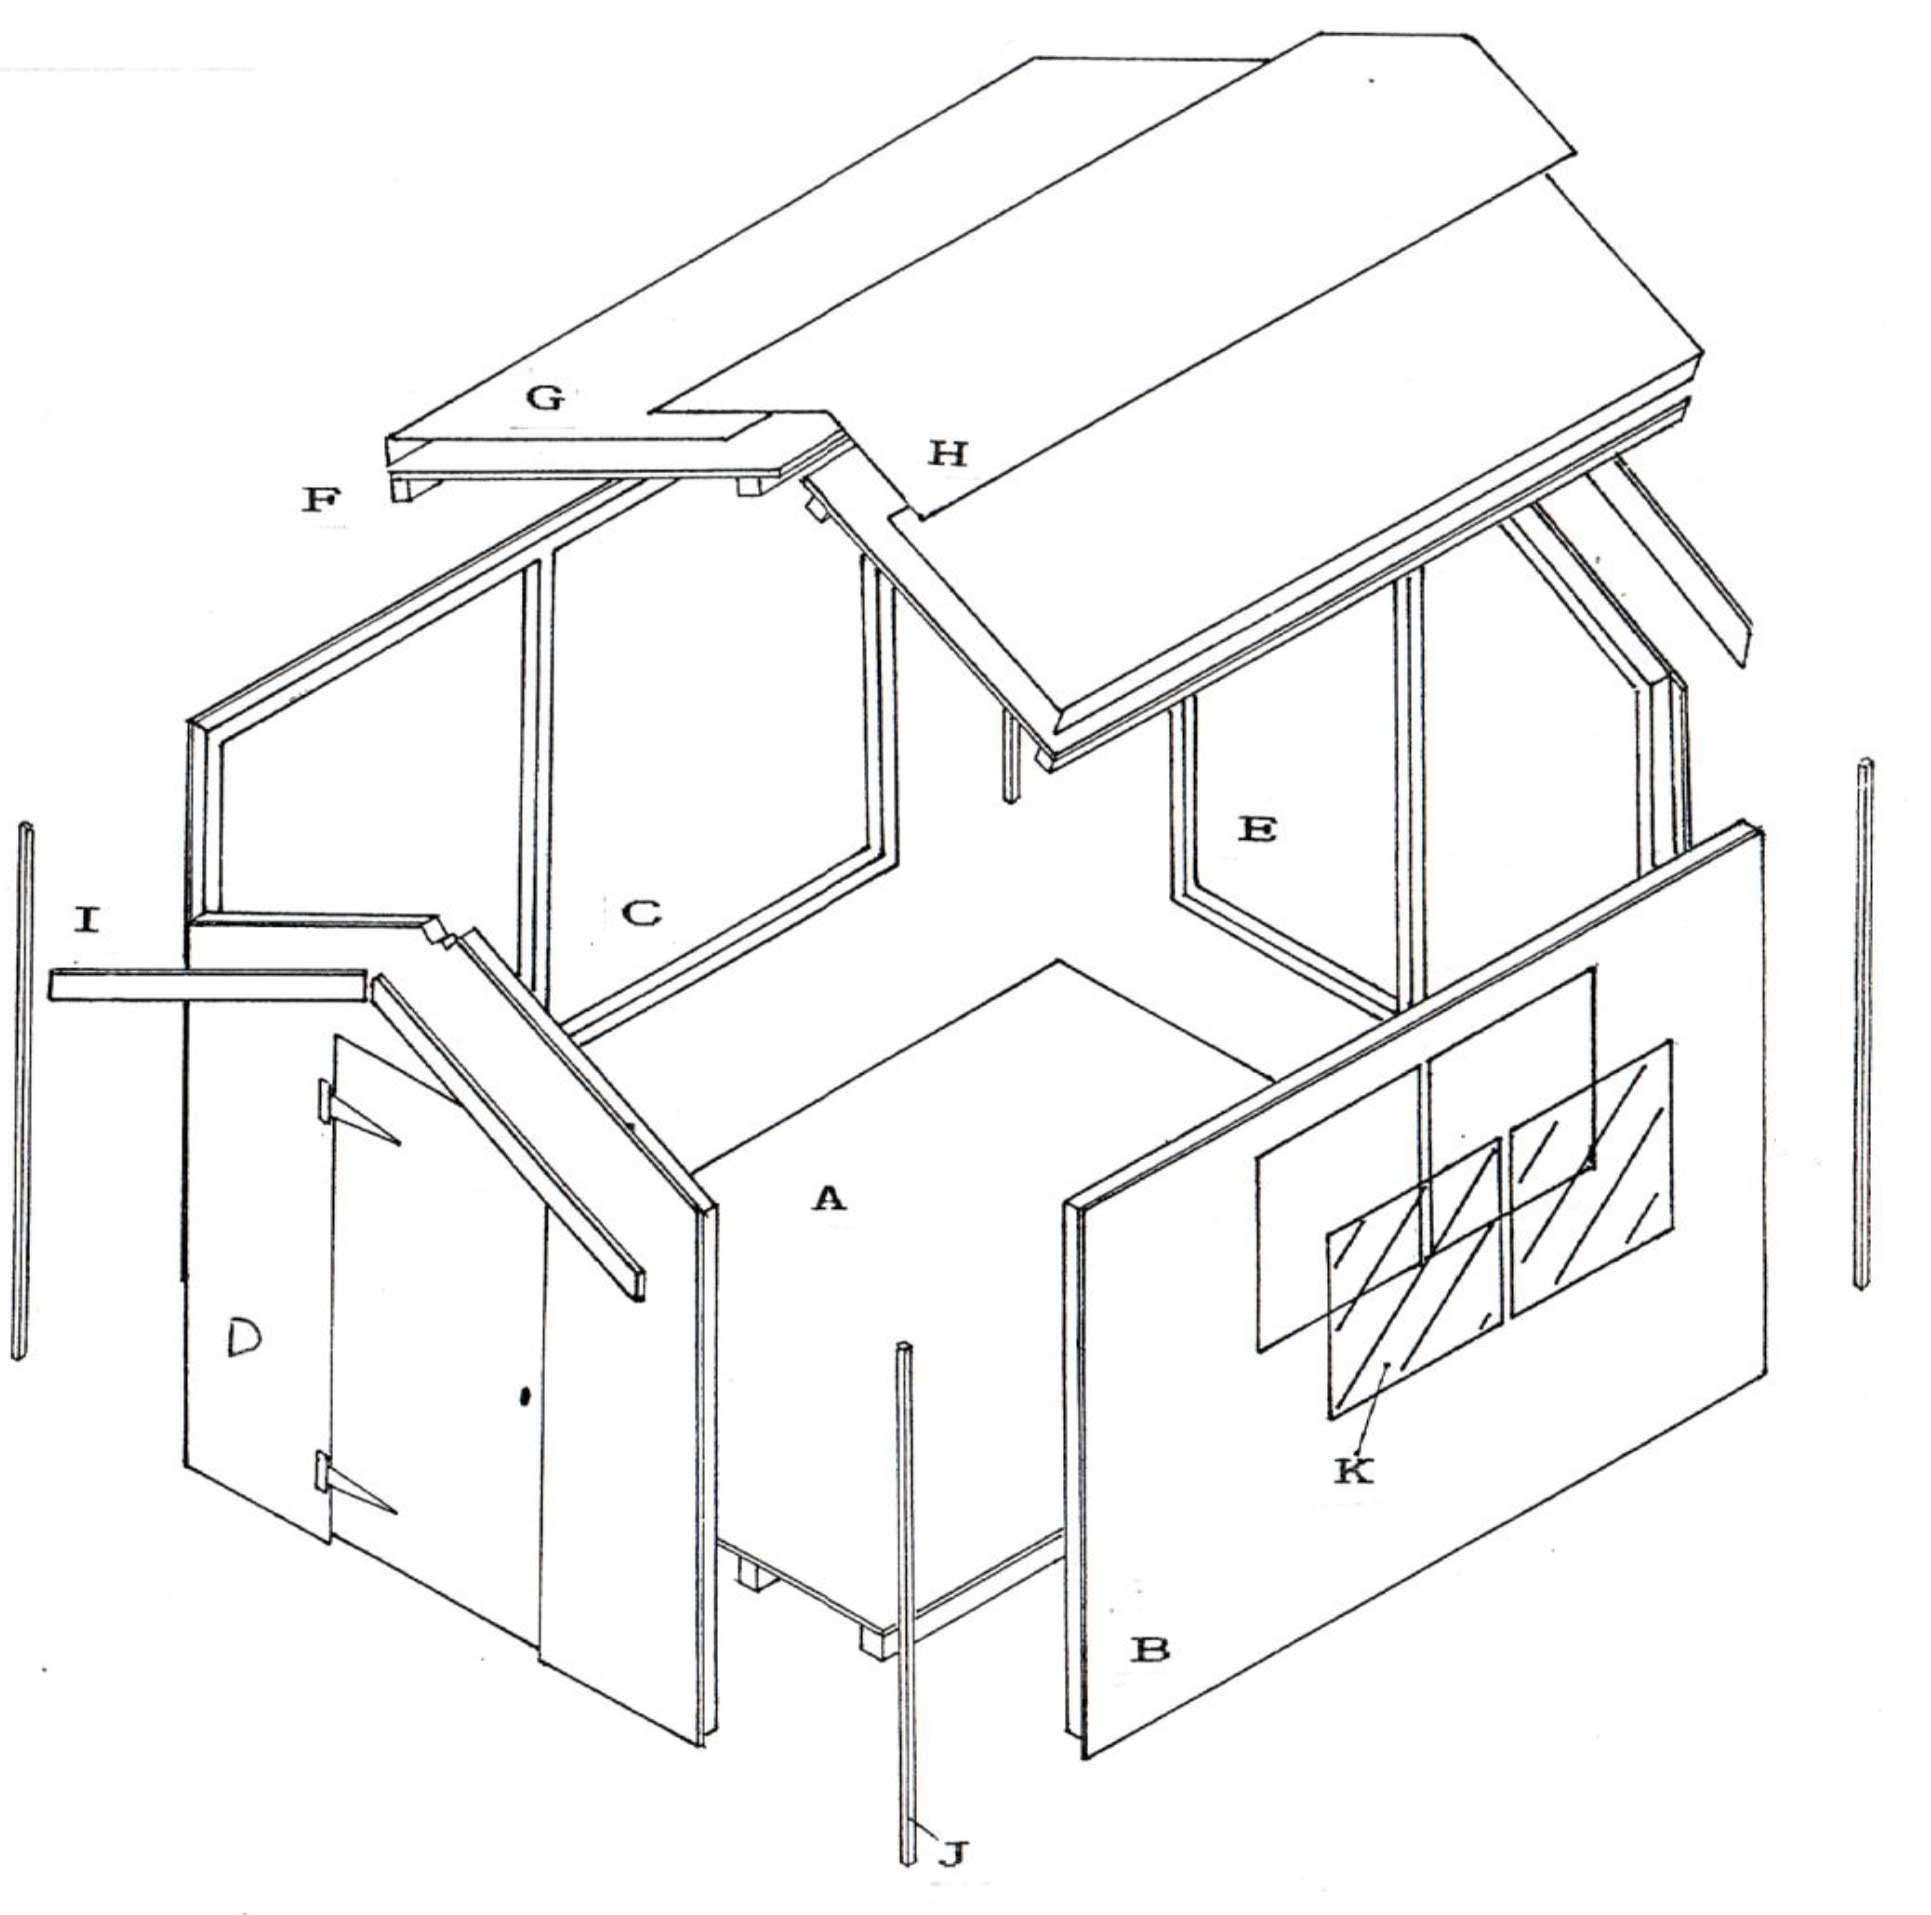
| A 1 x Floor section | E 1 x Plain gable | I 2 x Fascia boards |
| B 1 x Window side | F 2 x Roof sections | J 4 x Corner strips |
| C 1 x Plain side |
G 1 x Felt roll
|
K Glass |
| D 1 x Door gable | H 1 x Ridge felt | L 1 Nail & screw pack |
Assemble the shed walls
Start by positioning the plain gable on the back edge of the floor, with the lip on the panel overhanging the floor. Then position the plain side panel to form a corner with the gable, checking that the panels are butted together and sitting flat on the floor.
From the inside, screw through the frame of the gable into the side panel frame with two of the supplied screws, one each towards the top and bottom of the panel. We recommend drilling pilot holes for all of the screws on your shed.

Repeat the process to fix the window side panel to the gable, again making sure that all sections are sitting flush to the floor.
Then attach the door gable as before, securing to each wall. Make sure that you've removed the keys and unlocked the door before doing this to avoid locking yourself inside a half built shed!
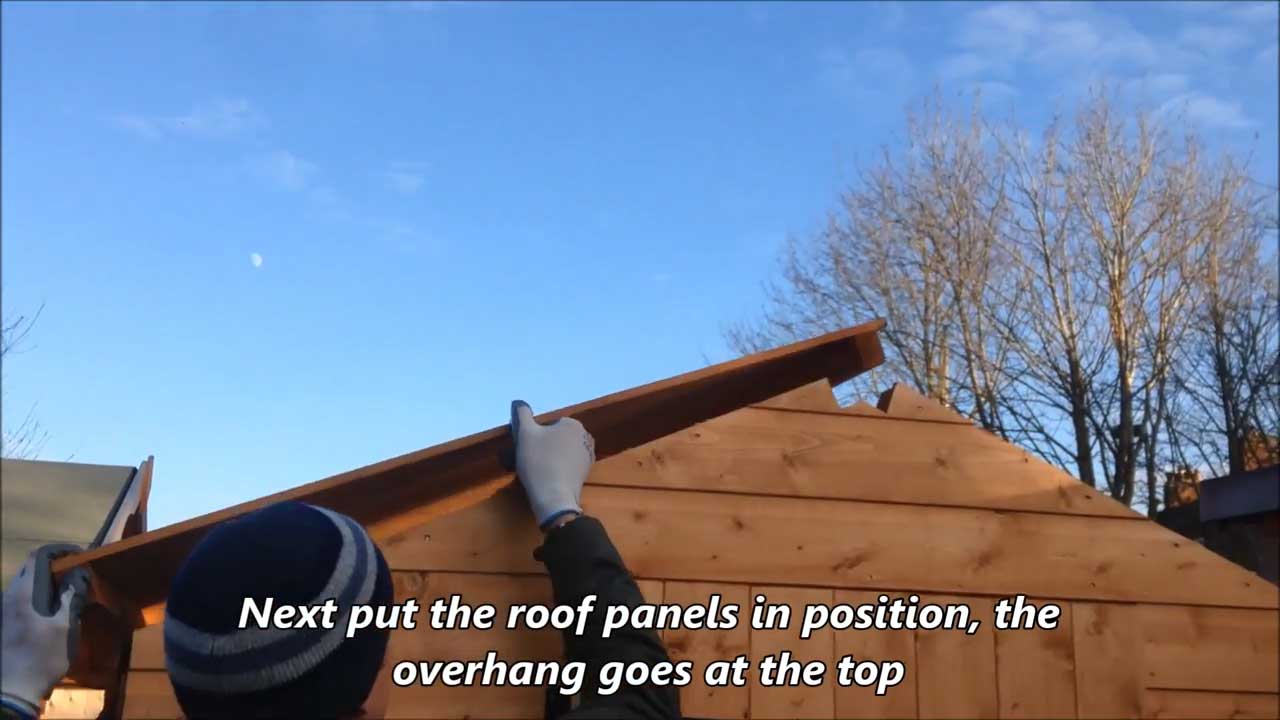
You will come back to secure the walls to the floor after checking the fit of the roof. Position the roof panels on the building so that the overhang on one side of the panel meets the notch at the apex. This will hold your roof panels in place while you check that it is sitting square and flat on the sides.
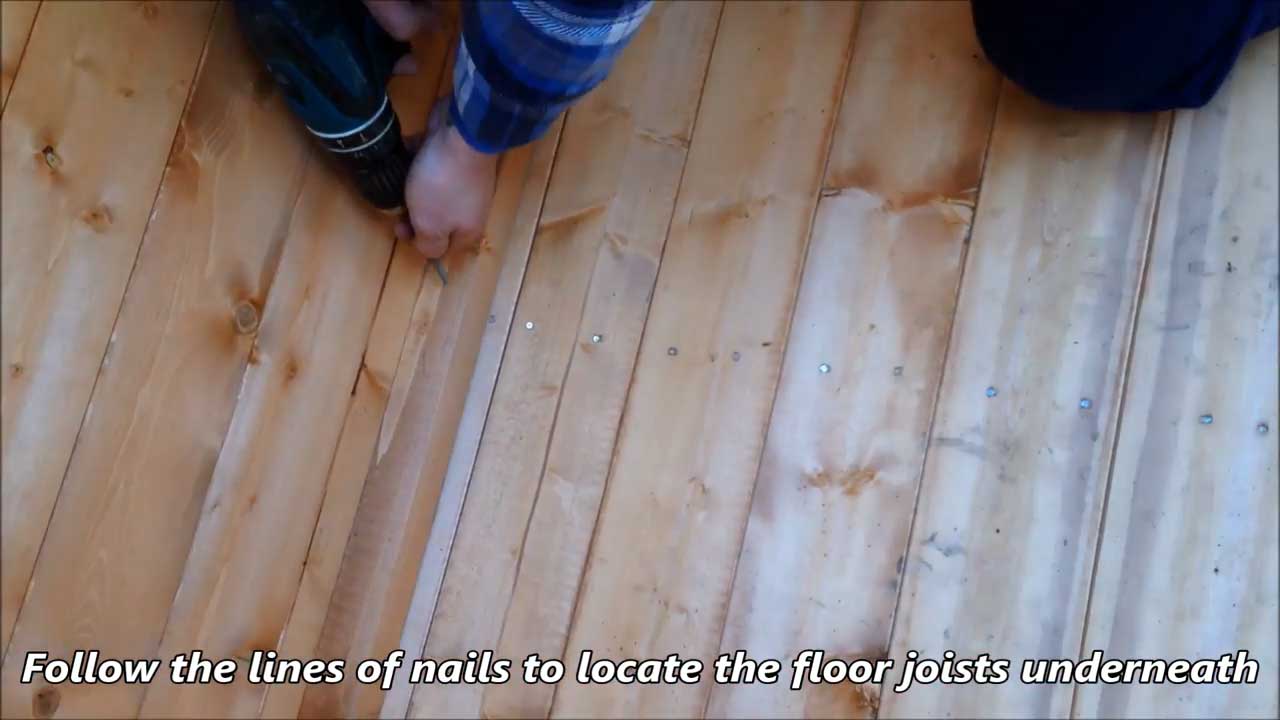
Secure the shed walls to the floor
Screw each wall panel to the floor with at least two screws, drilling vertically through the bottom of the frame into a floor joist below. You can locate the floor joists by the lines of nails running along the floor panel.
Fix the shed roof
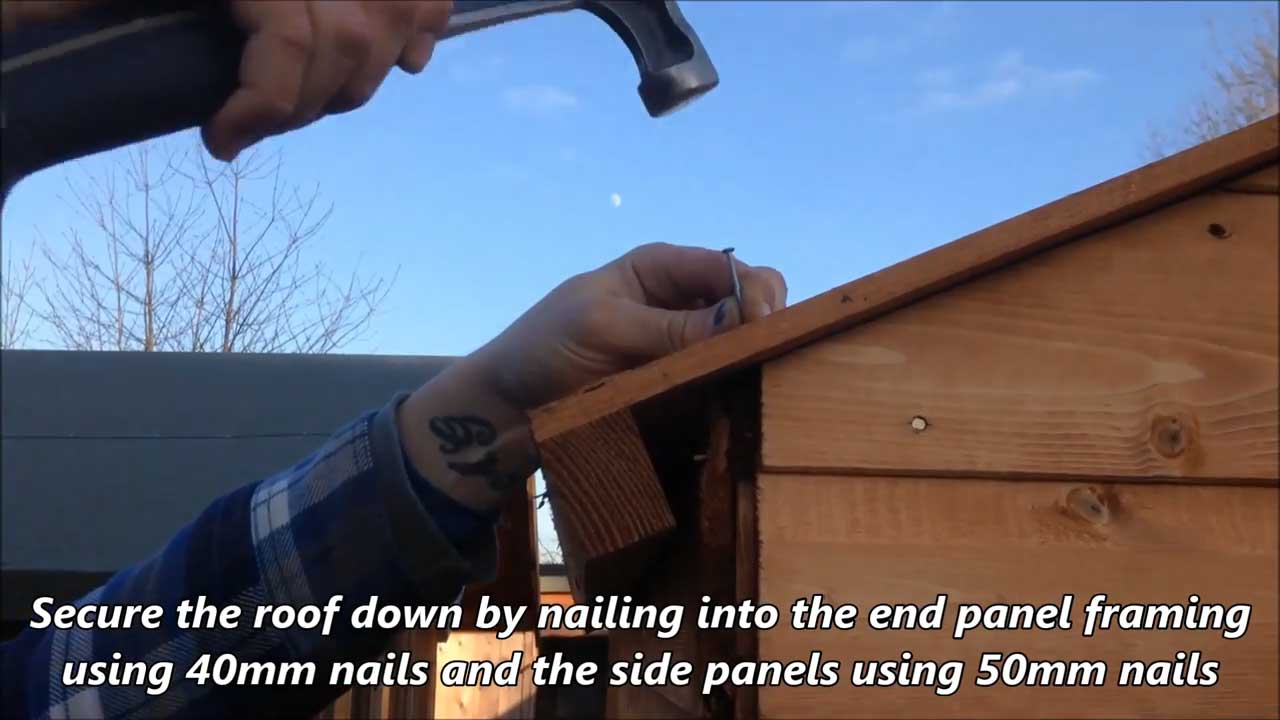
From the inside, screw the two roof panels together at the apex, then secure the panels from the outside by nailing into the sides and gables.
Unroll the roofing felt on a dry surface, remove the paper, then fold over to cut into two equal pieces. Lay one piece of the felt over one side of the roof so that it overhangs approximately 50mm on the side, and equally at each end.
Secure with three small clout nails at the upper edge, then fold the felt over the bottom side and secure with nails to the roof framing, working from the middle outwards with a nail every 100 to 150mm. Repeat for the top edge of the felt, nailing into the frame at the apex.
Repeat the process on the other side, overlapping the second felt section at the apex to leave a watertight fit. Some shed models may have an additional ridge felt piece which can be attached over the apex.
Add shed trimmings
To finish off your shed, nail the four fascia boards to the front and back of the roof, tucking the felt behind them and trimming if necessary. Fix the corner strips to the outside corners with nails, angling the nails into the framing for a secure fit.
Finally, glaze the window from the outside (always wear gloves when handling glass). Position the glass in situ, with your assistant supporting it from inside the shed, then apply the beading around the outside edge. Don't push the beading too tight against the glass or it will crack.
Treating or painting your shed
Your shed will come pre-treated with preservative, however we recommend applying a treatment or paint after six months, and then annually to keep your shed in optimum condition. We offer a wide range of shed treatments and paints in a variety of colours and finishes. Alternatively, more inspiration on painting your shed can be found in our article on How to Paint a Shed or Garden Building.
Ask the experts
For further advice about your project don’t hesitate to speak to our experts at your local AVS Fencing & Landscaping Supplies branch. Our ranges of storage, sheds and buildings have different delivery options by product range, either click and collect from your local AVS Branch or home delivery within our AVS Branch delivery area. Each product is clearly marked with its delivery options.
-
How to Fix a Fence Post using a Concrete Fence Repair Spur
Need to stabilise a wobbly fence quickly and effectively? Rather than replacing the entire fen …21st Feb 2022 -
Top Ten Quick Garden Makeover Projects
For those of us lucky enough to have some outdoor space at home, we've all come to apprecia …23rd Aug 2021 -
Lawn Edging Like a Pro With Steel Edging and Tree Rings
Whether you have a small urban garden or a sweeping country estate, keeping the edges of your …14th Jul 2021


